|   Home Home
 Bike
WorkShop Bike
WorkShop
 BB's
and Cranks BB's
and Cranks
Brakes
Chains
Cleaning
and lubrication
Mavic
Crossrides
GT
Idrive
Pre
Ride Checks
Punctures
RST
Forks
Size
Small
Tips
Suspension
Wheels
Riding
Tips
Play
Areas - EA
Play
Areas - Other
Routes
- EA
Routes
- Other
Reviews
Ride
Reports
Health
Gallery
Videos
Links
Our
Bikes
|
RST ELASTOMER
FORKS
After purchasing my RST 461 I found
the sever lack of info on the forks to be a problem, RST are very
good at answering problems but some pointers in the right direction
would be nice. The tips on this page should apply to all the RST Elastomer
forks including the 280,281,381 and 461 series of forks.
SERVICING
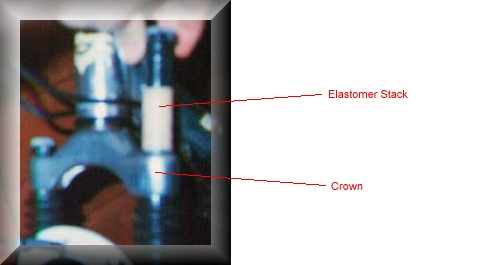
Diagram
of RST 461 Internal Layout
These
forks need servicing every 20-25 hours off road time. The manual that
RST provides is dire (well mine is) and the first thing that it tells
you to do is loosen the crown bolts, RST forks don't have crown bolts
any more. When I next service my forks (I've only just done it and
that's what prompted me into writing this page) I'll include some
nice pictures for you to see.
Doing
a routine service on these forks is a lot easier than some none RST
forks so here we go.
- Before you
start remove the wheel and the brake cable from the brake levers,
this will make pulling the lower legs a hell of a lot easier.
- Unscrew the
adjuster stacks from the fork, you will probably need to use a
adjustable spanner to got the size correct, make sure that you
undo them correctly as they only have plastic threads and plastic
is weaker than steel, don't want to strip the thread on these.
Once you have undone the adjuster's you will be able to pull the
elastomer stacks from the forks.
- At the bottom
of each leg, is a bolt remove these with a 4mm hex key. If you
look down the forks from where you have just removed the elastomer
you will be able to see a 8mm hex bolt hole, it may be necessary
to hold this in place with a 8mm hex key whilst undoing the 4mm
bolt at the bottom of the legs.
- Remove the
boots from the lower legs so they stay on the stanchions, this
will make refitting a whole lot easier.
- Pull up the
boots and sharply separate the lower legs and the stanchions.
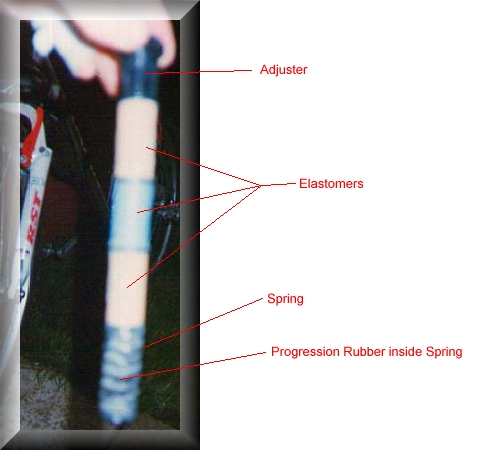
- Thoroughly
clean the stanchions and the elastomer stacks, I dissemble my
elastomer stacks when doing it as this makes it a lot easier to
clean the last of the grease out, basically they just pull apart
as there are plastic spacers in between.
- Grease the
seals and bushings in the lower legs and the elastomers using
a non-lithium grease, lithium grease damages the elastomers and
actually doesn't work very well. RST recommend Arlo Englund's
Slick Honey and Bel-Ray, I use PACE and that seems to work as
well as it gets.
- Grease the
bump stops and the drop outs at the bottom of the stanchions and
rebuild the forks.
UPGRADING
RST Elastomer forks are fairly
stiff and have room for a few changes, on the average ride the fork
should bottom out a couple of times, if you don't you are not using
all of your travel and have room to experiment. Please note that I
cannot take responsibility for any damage done by doing any of the
following.
- Replacement Elastomers can be bought, these
change the softness of you forks
- One alternative to Replacing elastomers
is to place them on a lave, and cut a few shallow rings around
them, this will make them easier to compress and allow them to
be compressed further before they 'Jam' together thus improving
the travel on your forks
- Boil the elastomers in water for 5 mins,
this reduces the amount of nitrogen in them and improves
performance
- In the springs at the bottom of the elastomers
is a piece of rubber, the spring handles the small dumps and the
rubber provides the progression of movement to the elastomers
on larger bumps, so the further the spring compressed the more
the elastomers are compressed so that it feels like a progressive
movement rather that Sprint/elastomer. Removal off one or both
(one in each leg) or reducing the size of the rubber may increase
you small bump response. On forks without air damping removal
of this piece of rubber may cause the shock to fell like a pogo
stick on small bumps as it seems to jump about. Reducing the size
of this on none air damped forks may increase your small bump
response while still allowing for progressive of bump to the elastomers
transfer, if in doubt try to source a piece of rubber that you
have use instead rather then destroy the ones that you bought
with the forks. I removed one on my 461's and didn't like the
response. I then reduced the size of both rubbers and it felt
that the fork dealt with repeating small bumps better.
- Reducing the size of the bump stop rubbers
(in the springs at the bottom of the elastomer stack) and the
bottom and inside of the stanchions can improve the travel on
the forks, best way thought is to source replacement rubbers so
that you can go back if you don't like.
DON'T
- Don't use Lithium grease it doesn't work
and it damages your elastomers
- Don't use Vegetable oil, it isn't sticky
enough to stay in the tops of you forks and you will find that
some area of you forks are not lubricated
- Don't use a mixture of grease and oil,
you will end up with a sticky mess that you cannot remove from
your forks
|